原文链接:
http://content.catalyze.io/blog/getting-started-with-apple-healthkit-part-2
随着iOS8的发布,现如今已经有很多关于苹果HealthKit的讨论,尤其是关于在应用市场里关于使用了HealthKit的app的讨论。在Catalyze中我们已经努力的扩充了许多的存储服务,并且不断的更新。这也是我们为什么去写下一篇关于HealthStoreclass的小文章。我们的CatalyzeStore能够很容易的去储存我们的数据到HealthKit中以及到Catalyze的baas服务器中。为了使用此服务,下载最新的repo代码或者更新版本至3.2。第二部分,我们将带你建立一个完整的应用,最后,你将会有一个最终的成品。学习特性数据,从HealthKit中获取数据,并且能够与保存,同步数据到HealthKit和Catalyze中。
从https://github.com/catalyzeio/RunLog 源中克隆代码。由于应用是使用了cocoa pods的,你在下载了应用之后,应该到工程根目录你执行控制台命令pod install,打开RunLog.xcworkspaceafter运行。
如果你还没有账号,可以到Catalyze的控制面板上注册。你将在注册的时候,需要创建组织,应用名称,api关键字,和一个自定义的类,并且类名叫做health_kit 。同时需要标注phi为true,名称要依照下面格式:
|
Column Name |
Data Type |
|
startDate |
string |
|
endDate |
string |
|
identifier |
string |
|
value |
double |
|
units |
string |
这种自定义类型的类是你HealthKit数据被保存后,利用Catalyse类进行转化的。接下来你需要做两件事,设置里的API key和你的application ID。这些被写在AppDelegate.m里,类似于: [Catalyze setApiKey:@”” applicationId:@“”];
你也应该需要插入你的用户名和密码到你的应用里。需要注意的是你现在是处在开发状态,当你产品发布的时候,应该有一个登录界面,让用户自行使用Catalyze账户或者注册一个新的。如果你想要备份你的数据,这一步是必须的。这些代码可以放在HomeViewController.m例如:[CatalyzeUser logInWithUsernameInBackground:@”” password:@“”….。
当你完成这些步骤之后,你就可以开始你的应用程序开发了。
提供权限
根据你需要的权限类型确定。
当你在你的应用里引入HealthKit framework了之后,你需要做的是确定下来你需要向你的用户获取什么类型的数据。我建议你花时间好好想一下。有几点需要注意:第一,对于你不用的Health数据你不用去获取请求。然后,对于你不需要的数据,你也不必去获取请求。请注意你不用的数据和你不需要的数据的区别。
本文的Runlog应用详细讲明了你不用的数据是那些。这个应用需要你提供体重,身高,同房,然后把这些数据显示在屏幕上。runlog也是一个非常好的应用,对于你不需要的数据的说明。我们现在使用的它,但是他的功能就是一个跑步记录器。通过HealthKit,我们将请求权限,并且向你展示如何使用数据,以及如何获取权限。
申请权限
现在我们能够直观的想一下我们所需要的数据类型,我们就能够写下申请权限的类型了。找到requestHealthKitData, dataTypesToRead, anddataTypesToWrite 在ProfileViewController.m 文件里。后两个方法比较简单,一旦你知道语法结构,你就能够知道是如何写的了,我们来完成它:
[code language=”objc”]
– (NSSet *)dataTypesToRead {
HKQuantityType *heightType = [HKQuantityType quantityTypeForIdentifier:HKQuantityTypeIdentifierHeight];
HKQuantityType *weightType = [HKQuantityType quantityTypeForIdentifier:HKQuantityTypeIdentifierBodyMass];
HKQuantityType *heartRate = [HKQuantityType quantityTypeForIdentifier:HKQuantityTypeIdentifierHeartRate];
HKQuantityType *walkingRunningDistance = [HKQuantityType quantityTypeForIdentifier:HKQuantityTypeIdentifierDistanceWalkingRunning];
HKCharacteristicType *biologicalSex = [HKCharacteristicType characteristicTypeForIdentifier:HKCharacteristicTypeIdentifierBiologicalSex];
HKCharacteristicType *birthday = [HKCharacteristicType characteristicTypeForIdentifier:HKCharacteristicTypeIdentifierDateOfBirth];
return [NSSet setWithObjects:heightType, weightType, heartRate, walkingRunningDistance, biologicalSex, birthday, nil];
}
[/code]
view rawDataTypesToRead.m hosted with ❤ by GitHub
[code language=”objc”]
– (NSSet *)dataTypesToWrite {
HKQuantityType *heightType = [HKQuantityType quantityTypeForIdentifier:HKQuantityTypeIdentifierHeight];
HKQuantityType *weightType = [HKQuantityType quantityTypeForIdentifier:HKQuantityTypeIdentifierBodyMass];
HKQuantityType *heartRate = [HKQuantityType quantityTypeForIdentifier:HKQuantityTypeIdentifierHeartRate];
HKQuantityType *walkingRunningDistance = [HKQuantityType quantityTypeForIdentifier:HKQuantityTypeIdentifierDistanceWalkingRunning];
return [NSSet setWithObjects:heightType, weightType, heartRate, walkingRunningDistance, nil];
}
[/code]
view rawDataTypesToWrite.m hosted with ❤ by GitHub
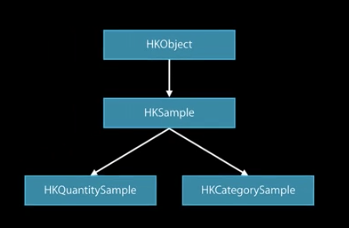
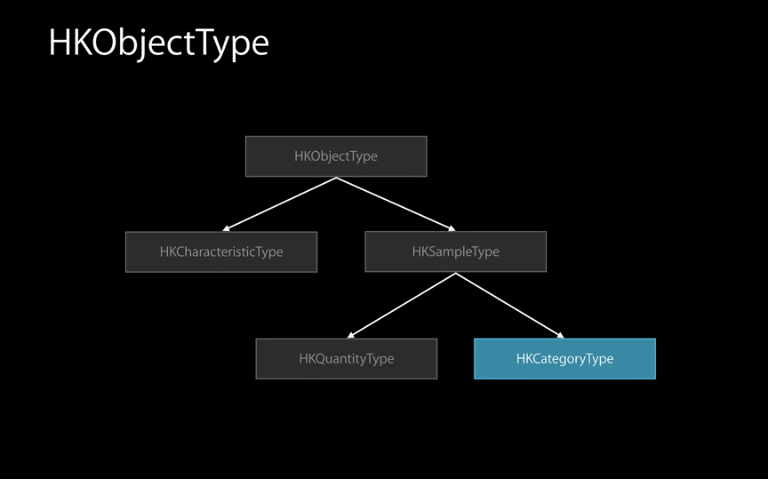
通过这些代码我们会发现HealthKit在获取读写权限的时候,会需要一个HKObjectTypes类型的NSSet。这是依据HKquantityType,HKCharacteristic类型的不同来去判断的。现在我们能够获取读写权限了。把这段代码放在requestHealthKitData里。
[code language=”objc”] [_healthStore requestAuthorizationToShareTypes:writeTypes readTypes:readTypes completion:^(BOOL success, NSError *error) {
if (!success) {
NSLog(@"You didn’t allow HealthKit to access these read/write data types. In your app, try to handle this error gracefully when a user decides not to provide access. The error was: %@.", error);
}
}]; [/code]
这些代码将会在viewcontroller里显示用户的权限。
填充特性数据
在第一节中,我讲述了HealthKit中的特性数据和非特性数据。runlog应用使用特性数据作为你获取权限的数据类型。现在只有同房信息和出生日期被填充。正如我们在获取权限部分看到的那样,你不能够写特性数据到healthkit中,所以这一部分就只针对特性数据进行讨论。
第一步,就是在ProfileViewController里找到prePopulateFields方法,找到同房信息并且更新label。为了查找特性数据,你可以选择同步执行的方法。我们现在筛选同房信息,并且把这些text field以正确的数据更新。
[code language=”objc”]HKBiologicalSexObject *biologicalSex = [_healthStore biologicalSexWithError:nil];
if (biologicalSex != nil) {
switch (biologicalSex.biologicalSex) {
case HKBiologicalSexFemale:
_txtBiologicalSex.text = @"female";
break;
case HKBiologicalSexMale:
_txtBiologicalSex.text = @"male";
break;
default:
break;
}
}[/code]
同样的,生日信息需要正确的日期格式,筛选出用户的生日,并且更新text field。
[code language=”objc”][formatter setDateFormat:@"MMMM dd, yyyy"];
_txtBirthday.text = [formatter stringFromDate:dob];[/code]
现在我们运行app到profile界面下我们将会看到生日、同房信息被列入了。如果你什么都没有看到,那是因为你还没有在Health app中设置它。把app关闭然后到Health app中,点击Health data tab button,然后点击Me,你见看到右上角有eidt按钮,你的界面应该看起来像这样。

更新你的生日,生殖健康信息信息,然后去你的runlog里看下你的Profile,你将看到这些区域里都被你刚刚更新的数据填充了。
查询
现在我们已经有了特性数据,现在我们应该包括非特性数据了。特性数据通过查询进行恢复,在这里,我们将会使用HKSampleQuery。我们将使用两个查询,一个用于获取用户最新的体重,一个用于获取用户的身高。
填充身高和体重区域
填充身高和体重数据几乎是相同的方法。因此我们将首先去查询身高数据。查询体重的数据直接粘贴下就好。
首先找到retrieveHeight在ProfileViewController.m里,这里有一个关于完成这些task的步骤。
- 构造一个查询。
- 将查询做出限制。
- 仅仅获取最新的结果信息(通过end date排序)。
- 不去筛选这些结果。
- 执行查询方法。
- 拉下身高(体重)值作为一个double类型数据,单位是英寸(磅)在返回的例程中。
- 在主线程中调用text field的更新方法。
让我们看下这些看些来是怎样的:
[code language=”objc”] HKQuantityType *heightType = [HKQuantityType quantityTypeForIdentifier:HKQuantityTypeIdentifierHeight];
// Since we are interested in retrieving the user’s latest sample
// we sort the samples in descending order by end date
// and set the limit to 1
NSSortDescriptor *timeSortDescriptor = [[NSSortDescriptor alloc] initWithKey:HKSampleSortIdentifierEndDate ascending:NO];
// construct the query & since we are not filtering the data the predicate is set to nil
HKSampleQuery *query = [[HKSampleQuery alloc] initWithSampleType:heightType predicate:nil limit:1 sortDescriptors:@[timeSortDescriptor] resultsHandler:^(HKSampleQuery *query, NSArray *results, NSError *error) {
// if there is a data point, dispatch to the main queue
if (results) {
dispatch_async(dispatch_get_main_queue(), ^{
HKQuantitySample *quantitySample = results.firstObject;
// pull out the quantity from the sample
HKQuantity *quantity = quantitySample.quantity;
HKUnit *heightUnit = [HKUnit inchUnit];
double usersHeight = [quantity doubleValueForUnit:heightUnit];
_txtHeight.text = [NSString stringWithFormat:@"%@ in", [NSNumberFormatter localizedStringFromNumber:@(usersHeight) numberStyle:NSNumberFormatterNoStyle]];
});
}
}];
// do not forget to execute the query after its constructed
[_healthStore executeQuery:query];[/code]
view rawPopulateWeight.m hosted with ❤ by GitHub
保存新的身高体重数据现在你运行app你将可以看到填充在text field里的最新的一些数据。如果你看不到任何数据,试着打开健康app然后到身高,体重模块下去添加一些数据。接下来我们将在我们的应用中讨论如何保存新的数据。
显示之前的数据是一个很好地开始,但是对应于身高和体重来说,这些不是常量固定的数据。这也是他们为什么没有归类到非特性数据里。我们应该允许用户去更新他们的身高和体重数据在授权页面上。为了实现此目的,我们应该构建HKQuantitySample对象并且把他们保存在Healthkit中。
在ProfileViewController.m中找到sorteHeight方法。这个方法将在用户在textfield里输入一些数据然后return后保存时调用,我们应该拿到身高数据,然后构建具有正确单位的例程。
[code language=”objc”] double height = _txtHeight.text.doubleValue;
HKUnit *inchUnit = [HKUnit inchUnit];
HKQuantity *heightQuantity = [HKQuantity quantityWithUnit:inchUnit doubleValue:height];
HKQuantityType *heightType = [HKQuantityType quantityTypeForIdentifier:HKQuantityTypeIdentifierHeight];
NSDate *now = [NSDate date];
HKQuantitySample *heightSample = [HKQuantitySample quantitySampleWithType:heightType quantity:heightQuantity startDate:now endDate:now];
[self.healthStore saveObject:heightSample withCompletion:^(BOOL success, NSError *error) {
[self retrieveHeight];
}];[/code]
view rawSaveHeight.m hosted with ❤ by GitHub
最后我们保存了例程然后调用我们之前写好的代码去更新textfield数据。体重的代码程序和这个相同。
[code language=”objc”] double weight = _txtWeight.text.doubleValue;
HKUnit *poundUnit = [HKUnit poundUnit];
HKQuantity *weightQuantity = [HKQuantity quantityWithUnit:poundUnit doubleValue:weight];
HKQuantityType *weightType = [HKQuantityType quantityTypeForIdentifier:HKQuantityTypeIdentifierBodyMass];
NSDate *now = [NSDate date];
HKQuantitySample *weightSample = [HKQuantitySample quantitySampleWithType:weightType quantity:weightQuantity startDate:now endDate:now];
[self.healthStore saveObject:weightSample withCompletion:^(BOOL success, NSError *error) {
[self retrieveWeight];
}];
[/code]
view rawSaveWeight.m hosted with ❤ by GitHub
到这时候你应该有了完整的权限页面。检查姓名首尾字母,生殖健康状况,生日,身高,体重,并且保存最新的身高体重信息,在试一下吧。
保存一条新的跑步信息
好的,我们已经有了一个完整的权限,并且我们我们整理了一个基础的查询。在所有的查询之后,是设置数据。这些数据可以是任何数位的,但是我们只关注于我们应用中的。在那样看来我们应该将一些数据存到HealthKit里,否则我们将查询不到任何信息。
打开NewRunLogViewController.m 然后找到saveAndFinish:方法。这个类的作用本质上是让用户保存他们最近一次的跑步信息。它收集了用户跑步的所有距离开始和结束的心率。然而我们并不是把这些数据取出直接放进HealthKit里的。我们将使用Catalyze的baas服务。当使用healthkit的时候,这个是一个非常重要的概念。你的应用在healthkit中存取的数据,可能在任意时候会被用户废除。你需要一个辅助的数据库来保存你的这些信息来防止用户废除的操作。
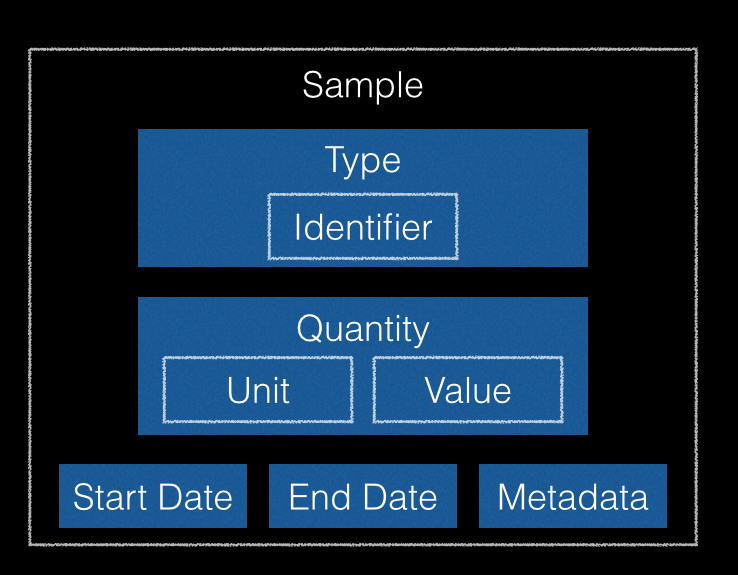
我们来存取一些数据。你需要以下6个组件。
- An HKUnit
- An HKQuantity
- An HKQuantityType
- An HKQuantitySample
- An HKQuantityTypeIdentifier
当用CatalyzeStore的时候,你只需要,一个组件
- An HKQuantityTypeIdentifier
我们能够从healthkit中抽离出来,所以你只需要给我们一些简单的数据类型就行。单位对应的类型有些时候也需要注意。下面是如何保存一条新的runlog:
[code language=”objc”] HKUnit *bpmUnit = [[HKUnit countUnit] unitDividedByUnit:[HKUnit minuteUnit]];
NSDate *startDate = (NSDate *)[_data objectForKey:kStartDate];
NSDate *endDate = [NSDate date];
NSMutableDictionary *metadata = [NSMutableDictionary dictionary];
[metadata setValue:[NSNumber numberWithDouble:_txtBeginningHeartRate.text.doubleValue] forKey:kBeginningHeartRate];
[metadata setValue:[NSNumber numberWithDouble:_txtEndingHeartRate.text.doubleValue] forKey:kEndingHeartRate];
// send the heart beat off to Catalyze and HealthKit
[CatalyzeStore saveQuantitySampleWithUnitString:@"mi" value:_txtDistance.text.doubleValue identifier:HKQuantityTypeIdentifierDistanceWalkingRunning startDate:startDate endDate:endDate metadata:metadata completion:^(BOOL success, NSError *error) {
if (success) {
NSMutableDictionary *metadata = [NSMutableDictionary dictionary];
// this is optional to store these booleans, but it may make for easier querying later
[metadata setValue:[NSNumber numberWithBool:YES] forKey:kBeginningHeartRate];
[CatalyzeStore saveQuantitySampleWithUnitString:bpmUnit.unitString value:_txtBeginningHeartRate.text.doubleValue identifier:HKQuantityTypeIdentifierHeartRate startDate:startDate endDate:startDate metadata:metadata completion:^(BOOL success, NSError *error) {
if (success) {
NSMutableDictionary *metadata = [NSMutableDictionary dictionary];
[metadata setValue:[NSNumber numberWithBool:YES] forKey:kEndingHeartRate];
[CatalyzeStore saveQuantitySampleWithUnitString:bpmUnit.unitString value:_txtEndingHeartRate.text.doubleValue identifier:HKQuantityTypeIdentifierHeartRate startDate:endDate endDate:endDate metadata:metadata completion:^(BOOL success, NSError *error) {
if (success) {
// all 3 completed, we’re done
_saved = YES;
[self.navigationController popViewControllerAnimated:YES];
} else {
NSLog(@"error saving end heart rate");
}
}];
} else {
NSLog(@"error saving beginning heart rate");
}
}];
} else {
NSLog(@"error saving distance");
}
}];[/code]
view rawSaveNewLog.m hosted with ❤ by GitHub
你可以看到我们收集我么所需要的数据,存储了所有对象的元数据,也集合了开始以及结束时间的信息。这个过程之后就是简单的保存到CatalyzeStore里。随意打开CatalyzeStore.m然后看下源文件。在里面我们保存了HKQuantitySamples对象在我们看到的第一篇文章里。
显示List列表
我们把数据利用Catalyze备份了下,也在HealthKit里储存了。现在用户打开runlog的时候,他们期望看到他们最新的一些信息。很想我们做的身高,体重那样,我们需要查询这些信息。有一个特性唯一的查询,在RunLogListViewController.m里找到queryRecentRunLogs方法,然后:
[code] HKSampleQuery *query = [[HKSampleQuery alloc] initWithSampleType:[HKQuantityType quantityTypeForIdentifier:HKQuantityTypeIdentifierDistanceWalkingRunning]
predicate:[HKSampleQuery predicateForObjectsWithNoCorrelation]
limit:20
sortDescriptors:@[[NSSortDescriptor sortDescriptorWithKey:HKSampleSortIdentifierEndDate ascending:NO]]
resultsHandler:^(HKSampleQuery *query, NSArray *results, NSError *error) {
dispatch_async(dispatch_get_main_queue(), ^{
_runLogs = [NSMutableArray arrayWithArray:results];
[_tblRunLog reloadData];
});
}];
// don’t forget to run the query after you create it!
[_healthStore executeQuery:query];[/code]
view rawQueryRecentLogs.m hosted with ❤ by GitHub
如果你注意到了这个查询的方式,我们是在里面使用了predicate方法的。在身高体重的查询中我们将predicate参数设置成了nil。predicate有很多的构建方法。但是最简单的一种方法就是使用内建的query帮助去创建的。这里,我们使用predicateForObjectsWithNoCorrelation作为HKSampleQuery的predicate。这个predicate是最好的形式。大部分的结果你想得到的就是大于或者小于某个特定的值的。predicate在使用的时候,我们并不关心数据间的关联,只关注结果。不关注任何事情的获取数据结果是快速的,这种处理方式很完美。
当你完成了这最后一个Runlog的时候,你拥有了一个完成的Runlog app。运行这个app然后开始记录一些数据吧。你可以在github上获取后续的更新。跟着这篇blog,你就是这样获取了一个完整的app。
更多的HealthKit
对于HealthKit所有功能,苹果已经做了封装,这值得我们称赞。我们还需要更多来去学习,而且Catalyze乐于帮助开发者,让他们的开发更为便捷。如果您有任何的反馈和疑问,请给我们发邮件。


